Showing posts with label Crafts. Show all posts

Sunday, June 26, 2016

From the clipping files: Late 1960s or early 1970s Family Circle article on paper jewelry designs by designer Kathryn Stoll


Original article text reads:
It's instant... it's easy... it's paper jewelry 
And it's yours for the making. Glazed gift-wraps in flash-bright colors, plus rubber cement, are the low-cost basic. Add double-face cellophane tape for sticking power, and you're all set for your paperwork. Designer Kathryn Stoll came up with these crisp twists. She likes her party curls (left) the most because they're both flattering and fun (and hit-of-the-party insurance as well). To get free instructions for making these new-as-now baubles, send a self-addressed business-size envelope, stamped, to Family Circle, Dept. 238, Box 1379, Grand Central Sta., New York, NY 10017 
By Audrey Brown
Creative-Crafts Editor
 
Inch-wide paper strips backed with shiny color (a second rubber-cemented strip) are the couldn't-be-simpler components of these bold new rings. You'll make them in loop-the-loop time, won't mind tossing them out after a few wearings because a half dozen more are at your fingertips. Create a special look with any of the five designs shown, or do your own takeoffs. 
Photographs by Art Barclay


DISCLAIMER: The sharing of the above vintage advertising is for educational and referential purposes only. Copyrights are most likely still held by the original publisher/agency. Use of these images for reproduction and/or derivative works for resale may be illegal and an infringement of the original publisher/agency's copyrights. So, in other words, don't make things with this image. It's illegal; it's wrong; and it could cost you a truckload of money when you get sued.
Pin It!

Friday, May 10, 2013

Take a plain cube vase and make it special for Mother's Day


Simple cube vases are quite inexpensive and a great staple to have around for floral arrangements. But what if you want to dress one up for a special occasion or holiday?

I dug into my stash of scrapbooking paper and paper punches and constructed this fun solution following these simple steps:

  1. I cut out four frames from a pretty colored card stock that would coordinate with the flowers that would be in the vase. For mine, I used a Sizzix Bigz die cutting frame (654446), but it isn't essential to use that equipment to achieve the same effect. You can even cut out the frames with scissors.
  2. I taped each of the frames end-to-end on the back with scotch tape.
  3. I taped together the ends of the end-to-end chain of frames to form a "box" of frames that slides nicely over the top of the cube vase.
  4. To embellish one of the frames for the front of the arrangement, I took one of the centers that had been cut out of one of the frames and used my other paper cutting equipment to make fancy corners. You can do those by hand with scissors too. I just happen to have some fun hand-punches.
  5. I cut out a smaller square out of white paper and embellished it with fancy paper punches then tape it on the front of the purple square using double-sided adhesive tape.
  6. I found a decorative font on my computer (I used "Romantiques" that's a free download at www.dafont.com
  7. In a simple MSWord document (any word processing software works), I typed out the word "Mother" in the font type I chose and made it a pretty shade of purple.
  8. I printed out the type onto purple paper using my inkjet printer.
  9. Using scissors, I freehand cut around the shapes of the letters without getting too close to the printing.
  10. I stuck adhesive pearl embellishments I had in my stash (I got mine at the craft store) on each letter (the wider letters got more than one pearl).
  11. I stuck a couple evenly spaced foam adhesive squares (also from the craft store) on the back of the "mother" cut-out and stuck it to the front of the glued squares at an angle.
  12. I stuck foam adhesive squares to the back of each corner of the whole front decoration and stuck it on the vase sleeve frame at an angle.
  13. For an added touch, I hot-glued simple pearl beading trim in little swags around the top edge of the vase sleeve.
  14. At the apex of each swag of pearl trim, I hot-glued a single tiny silk flower pulled from its stem (I got a whole sprig at the dollar store).
  15. As an added touch, after I placed the flowers in the center of the vase (using a floral frog is great for getting the look I got) I filled the vase with white liquid marbles and added submersible LED lights to make it glow from the inside.

Voila! I created a removable sleeve vase to doll up the plain glass cube vase for a special occasion. What's great is, I can do the same thing for other holidays and seasons and use the same vase over and over.


Happy creating and remember...
Pin It!

Monday, July 2, 2012

Floral decoration idea: Easy Red and Blue Lighted Floral Centerpiece

This is a great floral decoration for any event, but especially for an outdoor event that starts during the day and ends after the sun has gone down. It's also perfect for an indoor event in a location where fire codes don't allow open flames but you still want the look of lighted centerpieces. 


Happy creating and remember...
Pin It!

Wednesday, April 25, 2012

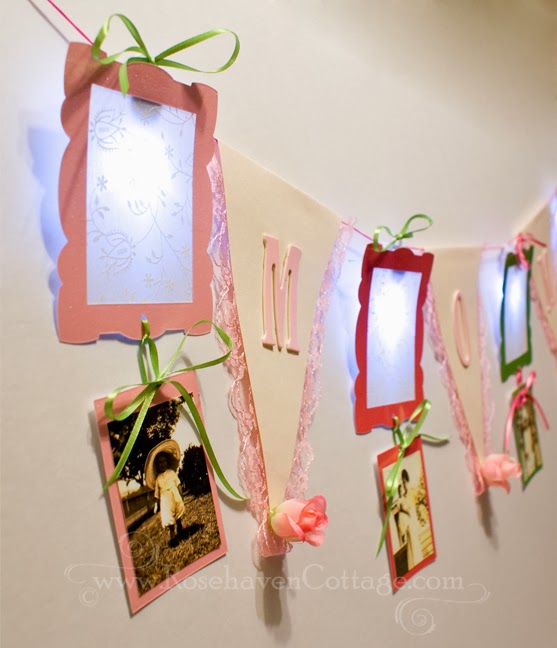
Craft idea: Lighted decorative "Mom" banner for Mother's Day


When I make paper crafts I try to use every bit of the fancy paper I've purchased. With that philosophy floating in the back of my mind, this craft idea was born.

I bought all the supplies at my local craft store--mostly in the fancy paper area. I bought a sheet each of some heavy glittery card-stock in pink, hot pink and lime green as well as a sheet of translucent paper with a printed floral pattern on it. Because I don't have die-cut equipment for cutting out letters, I found a set of pink cardboard letters (and they were on sale too).

Then I headed to the ribbon section to find some coordinating ribbon in lime green and some cording in hot pink. I also picked up some flat pink lace in the inexpensive lace section of the store.

I went to the dollar store for a sprig of small pink roses. The dollar store is the best place for cheap "silk" flowers that don't need to be look realistic and are perfect for hot glue crafting. But I also could have gotten those at the craft store and just paid a bit more.

I already had some small self-contained LED lights (the kind you can submerse in water for floral arrangements) that had clips on the backs. Any LED light from the craft store will work. The clips on the backs of these made it easier for hanging on the cord once I was done. But you could hot glue hanging ribbon to any LED light you use.


Once I gathered all my supplies, I used the Sizzix Bigz Die 654711 frame (Decorative Rectangle) to cut the frames. I had the Sizzix because of some promo pieces I was working on for them, but any frames will work (even ones cut freehand). I cut the translucent paper slightly larger than the opening in the frames and glued it and the LED light to the back of each frame.

The die-cut left a rectangle of paper that was cut from the middle, so I used that to mount old family photos I'd printed on my inkjet printer on glossy photo paper. 

Using a small hole punch, I punched a hole in the horizontal center of the top of the mounting paper and a hole in the horizontal center of the bottom of the frame. I threaded the tiny ribbon through and tied off a simple bow to hang the photo from the bottom of the frame.

I hot glued the lace and letters onto triangles I cut out of simple cream colored cardstock. I left about a 5/8 inch edge side opposite the point of each triangle to fold over the cording once I was done. 

I pulled the pink rosebuds from the bunch from the dollar store and hot glued one on the point of each triangle.

Finally, I tied ribbons on the top of each LED light clip and folded over the tops of each triangle, folding over the 5/8" edge and gluing the fold to the back with double-sided adhesive tape.

As shown, the banner spans 3.5 feet. If you choose to spell out "Mother" instead of "Mom" you can make yours even wider.


Happy creating and remember...
Pin It!

Monday, January 16, 2012

Craft Tutorial: Bride and Bridesmaid Shower Centerpieces


Figures pictured above stand almost 12 inches tall
(finished size depends on size of bottles used)

Make one of these for each table to match the bride and bridesmaids in the wedding party. Then give them away as take-home gifts to the bridesmaids after the shower is over.

Materials needed for each figure:
  • Plastic bottle (I used a fancy shaped squirt bottle from the dollar store)
  • Wide fringe or lace trim
  • Two white pipe cleaners
  • One "silk" rose with stem removed (the dollar store is great for this too)
  • Wide grosgrain (bridesmaid) or satin ribbon (bride)
  • Small silk roses or other flowers for bouquet and headpiece (removed from stem)
  • Small square of tulle (for the bride)
  • Pearl accent trim (for the bride)
  • Hot glue and glue gun
  • Optional LED floral lights (any kind at a craft store)
  • Liquid or glass marbles, sand, beads or anything decorative to fill the bottle


Next, download the face and head backs PDF below


Click here to download the free PDF file with the faces for you to color
  • Print the discs on heavy cardstock (WalMart has inexpensive cardstock that runs great through just about any printer)
  • Color each face with the desired skin tone and hair color
  • Color head back disc below each face with the same color as the hair color on the face above
  • Cut out each of the colored discs


If you aren't making lighted centerpieces than hot glue the face disc and head back disc (blank sides together) with the end of the pipe cleaner sandwiched in the middle.

Now add final embellishments like the tulle veil on the bride, flowers as headpieces and/or pearl trim on the veil and edge of base trim.


Happy creating and remember...
Pin It!

Wednesday, November 30, 2011

Craft Tutorial: Lighted Snowman Party Favor

Lighted Snowman Party Favor

Happy creating and remember...
Pin It!

Use of content in digital or print form
is strictly forbidden without written consent
unless noted as a free download.
Just ask... I may say "yes".

celebrations.com Invites & eCards
//Pin it button