Wednesday, April 25, 2012

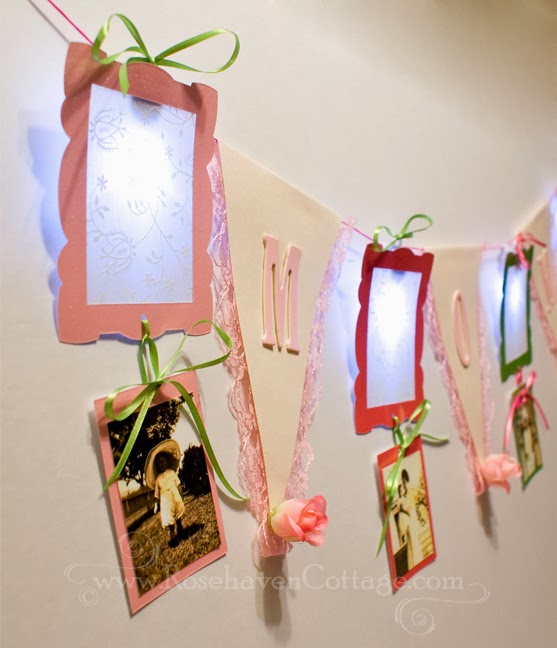
Craft idea: Lighted decorative "Mom" banner for Mother's Day


When I make paper crafts I try to use every bit of the fancy paper I've purchased. With that philosophy floating in the back of my mind, this craft idea was born.

I bought all the supplies at my local craft store--mostly in the fancy paper area. I bought a sheet each of some heavy glittery card-stock in pink, hot pink and lime green as well as a sheet of translucent paper with a printed floral pattern on it. Because I don't have die-cut equipment for cutting out letters, I found a set of pink cardboard letters (and they were on sale too).

Then I headed to the ribbon section to find some coordinating ribbon in lime green and some cording in hot pink. I also picked up some flat pink lace in the inexpensive lace section of the store.

I went to the dollar store for a sprig of small pink roses. The dollar store is the best place for cheap "silk" flowers that don't need to be look realistic and are perfect for hot glue crafting. But I also could have gotten those at the craft store and just paid a bit more.

I already had some small self-contained LED lights (the kind you can submerse in water for floral arrangements) that had clips on the backs. Any LED light from the craft store will work. The clips on the backs of these made it easier for hanging on the cord once I was done. But you could hot glue hanging ribbon to any LED light you use.


Once I gathered all my supplies, I used the Sizzix Bigz Die 654711 frame (Decorative Rectangle) to cut the frames. I had the Sizzix because of some promo pieces I was working on for them, but any frames will work (even ones cut freehand). I cut the translucent paper slightly larger than the opening in the frames and glued it and the LED light to the back of each frame.

The die-cut left a rectangle of paper that was cut from the middle, so I used that to mount old family photos I'd printed on my inkjet printer on glossy photo paper. 

Using a small hole punch, I punched a hole in the horizontal center of the top of the mounting paper and a hole in the horizontal center of the bottom of the frame. I threaded the tiny ribbon through and tied off a simple bow to hang the photo from the bottom of the frame.

I hot glued the lace and letters onto triangles I cut out of simple cream colored cardstock. I left about a 5/8 inch edge side opposite the point of each triangle to fold over the cording once I was done. 

I pulled the pink rosebuds from the bunch from the dollar store and hot glued one on the point of each triangle.

Finally, I tied ribbons on the top of each LED light clip and folded over the tops of each triangle, folding over the 5/8" edge and gluing the fold to the back with double-sided adhesive tape.

As shown, the banner spans 3.5 feet. If you choose to spell out "Mother" instead of "Mom" you can make yours even wider.


Happy creating and remember...
Pin It!

Monday, January 16, 2012

Craft Tutorial: Bride and Bridesmaid Shower Centerpieces


Figures pictured above stand almost 12 inches tall
(finished size depends on size of bottles used)

Make one of these for each table to match the bride and bridesmaids in the wedding party. Then give them away as take-home gifts to the bridesmaids after the shower is over.

Materials needed for each figure:
  • Plastic bottle (I used a fancy shaped squirt bottle from the dollar store)
  • Wide fringe or lace trim
  • Two white pipe cleaners
  • One "silk" rose with stem removed (the dollar store is great for this too)
  • Wide grosgrain (bridesmaid) or satin ribbon (bride)
  • Small silk roses or other flowers for bouquet and headpiece (removed from stem)
  • Small square of tulle (for the bride)
  • Pearl accent trim (for the bride)
  • Hot glue and glue gun
  • Optional LED floral lights (any kind at a craft store)
  • Liquid or glass marbles, sand, beads or anything decorative to fill the bottle


Next, download the face and head backs PDF below


Click here to download the free PDF file with the faces for you to color
  • Print the discs on heavy cardstock (WalMart has inexpensive cardstock that runs great through just about any printer)
  • Color each face with the desired skin tone and hair color
  • Color head back disc below each face with the same color as the hair color on the face above
  • Cut out each of the colored discs


If you aren't making lighted centerpieces than hot glue the face disc and head back disc (blank sides together) with the end of the pipe cleaner sandwiched in the middle.

Now add final embellishments like the tulle veil on the bride, flowers as headpieces and/or pearl trim on the veil and edge of base trim.


Happy creating and remember...
Pin It!

Wednesday, January 4, 2012

Freebie: Chinese lanterns invitations for any celebration


Living in the San Francisco Bay Area, I get the privilege of living within a short drive from San Franciso's famed Chinatown. On my last visit I photographed some beautifully colorful Chinese lanterns hanging in a shop. By bringing the photograph into Photoshop, I was able to create an art photo from it that then became the invitation design you see above.

My inspiration

Paper lanterns evoke for me wonderful images of making memories with celebrations and festive events--large and small. Glowing in the twilight, they seem magical to me. That's probably why I love John Singer Sargent's painting "Carnation, Lily, Lily, Rose". I love it so much that I have a framed print hanging on my studio door.


A bit of trivia
  • Chinese New Year begins on January 23rd
  • This year, 2012, will be the year of the dragon
  • In China, Chinese New Year is known as "Spring Festival" (the literal translation of the Chinese name 春节 (Pinyin: Chūn Jié)
  • The festival begins on the first day of the first month in the traditional Chinese calender and ends with Lantern Festival which is on the 15th day.


Happy creating and remember...

Pin It!

Wednesday, November 30, 2011

Craft Tutorial: Lighted Snowman Party Favor

Lighted Snowman Party Favor

Happy creating and remember...
Pin It!

Wednesday, October 19, 2011

Freebie: Chocolate pie invite (with the recipe)


My previous post featuring lemon meringue pie may have made some of your mouths water, but I know that chocolate lovers really don't salivate for anything that isn't chocolate. So for all you chocolate lovers out there here it is...

"Chocolate pie"!


Like my previously featured watercolor painting, I found my inspiration in a vintage Borden recipe booklet I picked up at my local antique shop. It was full of technicolor photographs of delectable desserts including a yummy looking recipe for "Magic Chocolate Pie". I don't know how "magic" it is, but it sure looks full of chocolate-y goodness.

Want to make this pie for your own holiday gathering? Well, here's the original recipe in all its glory (click on the image below to see it larger).


Recipe for "Magic Chocolate Pie"


Pin It!

Use of content in digital or print form
is strictly forbidden without written consent
unless noted as a free download.
Just ask... I may say "yes".

celebrations.com Invites & eCards
//Pin it button